

How To Install The Blog Module To A Dnn Site
In this tutorial, you will learn how to use OpenCV's "Deep Neural Network" (DNN) module with NVIDIA GPUs, CUDA, and cuDNN for 211-1549% faster inference.
Back in August 2017, I published my first tutorial on using OpenCV's "deep neural network" (DNN) module for image classification.
PyImageSearch readers loved the convenience and ease-of-use of OpenCV's dnn module so much that I then went on to publish additional tutorials on the dnn module, including:
- Object detection with deep learning and OpenCV
- Real-time object detection with deep learning and OpenCV
- YOLO object detection with OpenCV
- Mask R-CNN with OpenCV
Each one of those guides used OpenCV's dnn module to (1) load a pre-trained network from disk, (2) make predictions on an input image, and then (3) display the results, allowing you to build your own custom computer vision/deep learning pipeline for your particular project.
However, the biggest problem with OpenCV's dnn module was a lack of NVIDIA GPU/CUDA support — using these models you could not easily use a GPU to improve the frames per second (FPS) processing rate of your pipeline.
That wasn't too much of a big deal for the Single Shot Detector (SSD) tutorials, which can easily run at 25-30+ FPS on a CPU, but it was a huge problem for YOLO and Mask R-CNN which struggle to get above 1-3 FPS on a CPU.
That all changed in 2019's Google Summer of Code (GSoC).
Led by dlib's Davis King, and implemented by Yashas Samaga, OpenCV 4.2 now supports NVIDIA GPUs for inference using OpenCV's dnn module, improving inference speed by up to 1549%!
In today's tutorial, I show you how to compile and install OpenCV to take advantage of your NVIDIA GPU for deep neural network inference.
Then, in next week's tutorial, I'll provide you with Single Shot Detector, YOLO, and Mask R-CNN code that can be used to take advantage of your GPU using OpenCV. We'll then benchmark the results and compare them to CPU-only inference so you know which models can benefit the most from using a GPU.
To learn how to compile and install OpenCV's "dnn" module with NVIDIA GPU, CUDA, and cuDNN support, just keep reading!
![]()
Looking for the source code to this post?
Jump Right To The Downloads SectionHow to use OpenCV's 'dnn' module with NVIDIA GPUs, CUDA, and cuDNN
In the remainder of this tutorial I will show you how to compile OpenCV from source so you can take advantage of NVIDIA GPU-accelerated inference for pre-trained deep neural networks.
Assumptions when compiling OpenCV for NVIDIA GPU support
In order to compile and install OpenCV's "deep neural network" module with NVIDIA GPU support, I will be making the following assumptions:
- You have an NVIDIA GPU. This should be an obvious assumption. If you do not have an NVIDIA GPU, you cannot compile OpenCV's "dnn" module with NVIDIA GPU support.
- You are using Ubuntu 18.04 (or another Debian-based distribution). When it comes to deep learning, I strongly recommend Unix-based machines over Windows systems (in fact, I don't support Windows on the PyImageSearch blog). If you intend to use a GPU for deep learning, go with Ubuntu over macOS or Windows — it's so much easier to configure.
- You know how to use a command line. We'll be making use of the command line in this tutorial. If you're unfamiliar with the command line, I recommend reading this intro to the command line first and then spending a few hours (or even days) practicing. Again, this tutorial is not for those brand new to the command line.
- You are capable of reading terminal output and diagnosing issues. Compiling OpenCV from source can be challenging if you've never done it before — there are a number of things that can trip you up, including missing packages, incorrect library paths, etc. Even with my detailed guides, you will likely make a mistake along the way. Don't be discouraged! Take the time to understand the commands you're executing, what they do, and most importantly, read the output of the commands! Don't go blindly copying and pasting; you'll only run into errors.
With all that said, let's start configuring OpenCV's "dnn" module for NVIDIA GPU inference.
Step #1: Install NVIDIA CUDA drivers, CUDA Toolkit, and cuDNN

This tutorial makes the assumption that you already have:
- An NVIDIA GPU
- The CUDA drivers for that particular GPU installed
- CUDA Toolkit and cuDNN configured and installed
If you have an NVIDIA GPU on your system but have yet to install the CUDA drivers, CUDA Toolkit, and cuDNN, you will need to configure your machine first — I will not be covering CUDA configuration and installation in this guide.
To learn how to install the NVIDIA CUDA drivers, CUDA Toolkit, and cuDNN, I recommend you read my Ubuntu 18.04 and TensorFlow/Keras GPU install guide — once you have the proper NVIDIA drivers and toolkits installed, you can come back to this tutorial.
Step #2: Install OpenCV and "dnn" GPU dependencies
The first step in configuring OpenCV's "dnn" module for NVIDIA GPU inference is to install the proper dependencies:
$ sudo apt-get update $ sudo apt-get upgrade $ sudo apt-get install build-essential cmake unzip pkg-config $ sudo apt-get install libjpeg-dev libpng-dev libtiff-dev $ sudo apt-get install libavcodec-dev libavformat-dev libswscale-dev $ sudo apt-get install libv4l-dev libxvidcore-dev libx264-dev $ sudo apt-get install libgtk-3-dev $ sudo apt-get install libatlas-base-dev gfortran $ sudo apt-get install python3-dev
Most of these packages should have been installed if you followed my Ubuntu 18.04 Deep Learning configuration guide, but I would recommend running the above command just to be safe.
Step #3: Download OpenCV source code
There is no "pip-installable" version of OpenCV that comes with NVIDIA GPU support — instead, we'll need to compile OpenCV from scratch with the proper NVIDIA GPU configurations set.
The first step in doing so is to download the source code for OpenCV v4.2:
$ cd ~ $ wget -O opencv.zip https://github.com/opencv/opencv/archive/4.2.0.zip $ wget -O opencv_contrib.zip https://github.com/opencv/opencv_contrib/archive/4.2.0.zip $ unzip opencv.zip $ unzip opencv_contrib.zip $ mv opencv-4.2.0 opencv $ mv opencv_contrib-4.2.0 opencv_contrib
We can now move on with configuring our build.
Step #4: Configure Python virtual environment
If you followed my Ubuntu 18.04, TensorFlow, and Keras Deep Learning configuration guide, then you should already have virtualenv and virtualenvwrapper installed:
- If your machine is already configured, skip to the
mkvirtualenvcommands in this section. - Otherwise, follow along with each of these steps to configure your machine.
Python virtual environments are a best practice when it comes to Python development. They allow you to test different versions of Python libraries in sequestered, independent development and production environments. Python virtual environments are considered a best practice in the Python world — I use them daily and you should too.
If you haven't yet installed pip, Python's package manager, you can do so using the following command:
$ wget https://bootstrap.pypa.io/get-pip.py $ sudo python3 get-pip.py
Once pip is installed, you can install both virtualenv and virtualenvwrapper:
$ sudo pip install virtualenv virtualenvwrapper $ sudo rm -rf ~/get-pip.py ~/.cache/pip
You then need to open up your ~/.bashrc file and update it to automatically load virtualenv/virtualenvwrapper whenever you open up a terminal.
I prefer to use the nano text editor, but you can use whichever editor you are most comfortable with:
$ nano ~/.bashrc
Once you have the ~/.bashrc file open, scroll to the bottom of the file, and insert the following:
# virtualenv and virtualenvwrapper export WORKON_HOME=$HOME/.virtualenvs export VIRTUALENVWRAPPER_PYTHON=/usr/bin/python3 source /usr/local/bin/virtualenvwrapper.sh
From there, save and exit your terminal (ctrl + x , y , enter).
You can then reload your ~/.bashrc file in your terminal session:
$ source ~/.bashrc
You only need to run the above command once — since you updated your ~/.bashrc file, the virtualenv/virtualenvwrapper environment variables will be automatically set whenever you open a new terminal window.
The final step is to create your Python virtual environment:
$ mkvirtualenv opencv_cuda -p python3
The mkvirtualenv command creates a new Python virtual environment named opencv_cuda using Python 3.
You should then install NumPy into the opencv_cuda environment:
$ pip install numpy
If you ever close your terminal or deactivate your Python virtual environment, you can access it again via the workon command:
$ workon opencv_cuda
If you are new to Python virtual environments, I suggest you take a second and read up on how they work — they are a best practice in the Python world.
If you choose not to use them, that's perfectly fine, but keep in mind that your choice doesn't absolve you from learning proper Python best practices. Take the time now to invest in your knowledge.
Step #5: Determine your CUDA architecture version
When compiling OpenCV's "dnn" module with NVIDIA GPU support, we'll need to determine our NVIDIA GPU architecture version:
- This version number is a requirement when we set the
CUDA_ARCH_BINvariable in ourcmakecommand in the next section. - The NVIDIA GPU architecture version is dependent on which GPU you are using, so ensure you know your GPU model ahead of time.
- Failing to correctly set your
CUDA_ARCH_BINvariable can result in OpenCV still compiling but failing to use your GPU for inference (making it troublesome to diagnose and debug).
One of the easiest ways to determine your NVIDIA GPU architecture version is to simply use the nvidia-smi command:
$ nvidia-smi Mon Jan 27 14:11:32 2020 +-----------------------------------------------------------------------------+ | NVIDIA-SMI 410.104 Driver Version: 410.104 CUDA Version: 10.0 | |-------------------------------+----------------------+----------------------+ | GPU Name Persistence-M| Bus-Id Disp.A | Volatile Uncorr. ECC | | Fan Temp Perf Pwr:Usage/Cap| Memory-Usage | GPU-Util Compute M. | |===============================+======================+======================| | 0 Tesla V100-SXM2... Off | 00000000:00:04.0 Off | 0 | | N/A 35C P0 38W / 300W | 0MiB / 16130MiB | 0% Default | +-------------------------------+----------------------+----------------------+ +-----------------------------------------------------------------------------+ | Processes: GPU Memory | | GPU PID Type Process name Usage | |=============================================================================| | No running processes found | +-----------------------------------------------------------------------------+
Inspecting the output, you can see that I am using an NVIDIA Tesla V100 GPU. Make sure you run the nvidia-smi command yourself to verify your GPU model before continuing.
Now that I have my NVIDIA GPU model, I can move on to determining the architecture version.
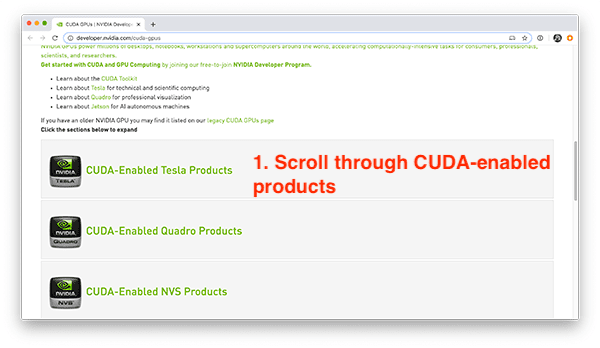
You can find your NVIDIA GPU architecture version for your particular GPU using this page:
https://developer.nvidia.com/cuda-gpus
Scroll down to the list of CUDA-Enabled Tesla, Quadro, NVS, GeForce/Titan, and Jetson products:
Since I am using a V100, I'll click on the "CUDA-Enabled Tesla Products" section:
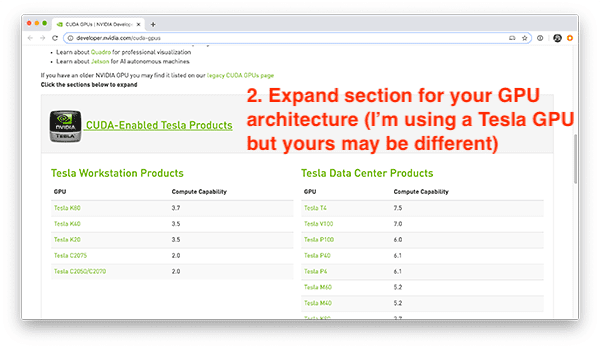
Scrolling down, I can see my V100 GPU:
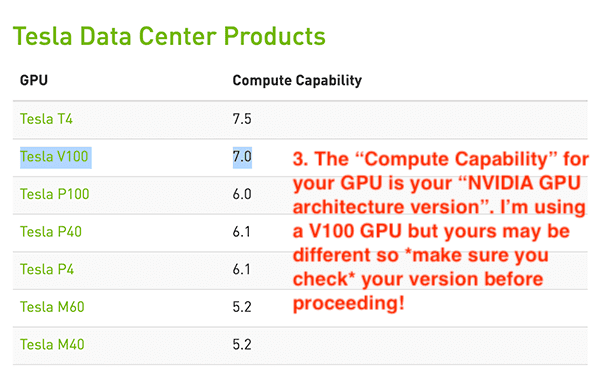
As you can see, my NVIDIA GPU architecture version is 7.0 — you should perform the same process for your own GPU model.
Once you've identified your NVIDIA GPU architecture version, make note of it, and then proceed to the next section.
Step #6: Configure OpenCV with NVIDIA GPU support
At this point we are ready to configure our build using the cmake command.
The cmake command scans for dependencies, configures the build, and generates the files necessary for make to actually compile OpenCV.
To configure the build, start by making sure you are inside the Python virtual environment you are using to compile OpenCV with NVIDIA GPU support:
$ workon opencv_cuda
Next, change directory to where you downloaded the OpenCV source code, and then create a build directory:
$ cd ~/opencv $ mkdir build $ cd build
You can then run the following cmake command, making sure you set the CUDA_ARCH_BIN variable based on your NVIDIA GPU architecture version, which you found in the previous section:
$ cmake -D CMAKE_BUILD_TYPE=RELEASE \ -D CMAKE_INSTALL_PREFIX=/usr/local \ -D INSTALL_PYTHON_EXAMPLES=ON \ -D INSTALL_C_EXAMPLES=OFF \ -D OPENCV_ENABLE_NONFREE=ON \ -D WITH_CUDA=ON \ -D WITH_CUDNN=ON \ -D OPENCV_DNN_CUDA=ON \ -D ENABLE_FAST_MATH=1 \ -D CUDA_FAST_MATH=1 \ -D CUDA_ARCH_BIN=7.0 \ -D WITH_CUBLAS=1 \ -D OPENCV_EXTRA_MODULES_PATH=~/opencv_contrib/modules \ -D HAVE_opencv_python3=ON \ -D PYTHON_EXECUTABLE=~/.virtualenvs/opencv_cuda/bin/python \ -D BUILD_EXAMPLES=ON ..
Here you can see that we are compiling OpenCV with both CUDA and cuDNN support enabled (WITH_CUDA and WITH_CUDNN, respectively).
We also instruct OpenCV to build the "dnn" module with CUDA support (OPENCV_DNN_CUDA).
We also ENABLE_FAST_MATH, CUDA_FAST_MATH, and WITH_CUBLAS for optimization purposes.
The most important, and error-prone, configuration is your CUDA_ARCH_BIN — make sure you set it correctly!
The CUDA_ARCH_BIN variable must map to your NVIDIA GPU architecture version found in the previous section.
If you set this value incorrectly, OpenCV still may compile, but you'll receive the following error message when you try to perform inference using the dnn module:
File "ssd_object_detection.py", line 74, in detections = net.forward() cv2.error: OpenCV(4.2.0) /home/a_rosebrock/opencv/modules/dnn/src/cuda/execution.hpp:52: error: (-217:Gpu API call) invalid device function in function 'make_policy'
If you encounter this error, then you know your CUDA_ARCH_BIN was not set properly.
You can verify that your cmake command executed properly by looking at the output:
... -- NVIDIA CUDA: YES (ver 10.0, CUFFT CUBLAS FAST_MATH) -- NVIDIA GPU arch: 70 -- NVIDIA PTX archs: -- -- cuDNN: YES (ver 7.6.0) ...
Here you can see that OpenCV and cmake have correctly identified my CUDA-enabled GPU, NVIDIA GPU architecture version, and cuDNN version.
I also like to look at the OpenCV modules section, in particular the To be built portion:
-- OpenCV modules: -- To be built: aruco bgsegm bioinspired calib3d ccalib core cudaarithm cudabgsegm cudacodec cudafeatures2d cudafilters cudaimgproc cudalegacy cudaobjdetect cudaoptflow cudastereo cudawarping cudev datasets dnn dnn_objdetect dnn_superres dpm face features2d flann fuzzy gapi hdf hfs highgui img_hash imgcodecs imgproc line_descriptor ml objdetect optflow phase_unwrapping photo plot python3 quality reg rgbd saliency shape stereo stitching structured_light superres surface_matching text tracking ts video videoio videostab xfeatures2d ximgproc xobjdetect xphoto -- Disabled: world -- Disabled by dependency: - -- Unavailable: cnn_3dobj cvv freetype java js matlab ovis python2 sfm viz -- Applications: tests perf_tests examples apps -- Documentation: NO -- Non-free algorithms: YES
Here you can see there are a number of cuda* modules, indicating that cmake is instructing OpenCV to build our CUDA-enabled modules (including OpenCV's "dnn" module).
You can also look at the Python 3 section to verify that both your Interpreter and numpy point to your Python virtual environment:
-- Python 3: -- Interpreter: /home/a_rosebrock/.virtualenvs/opencv_cuda/bin/python3 (ver 3.5.3) -- Libraries: /usr/lib/x86_64-linux-gnu/libpython3.5m.so (ver 3.5.3) -- numpy: /home/a_rosebrock/.virtualenvs/opencv_cuda/lib/python3.5/site-packages/numpy/core/include (ver 1.18.1) -- install path: lib/python3.5/site-packages/cv2/python-3.5
Make sure you take note of the install path as well!
You'll be needing that path when we finish the OpenCV install.
Step #7: Compile OpenCV with "dnn" GPU support
Provided cmake exited without an error, you can then compile OpenCV with NVIDIA GPU support using the following command:
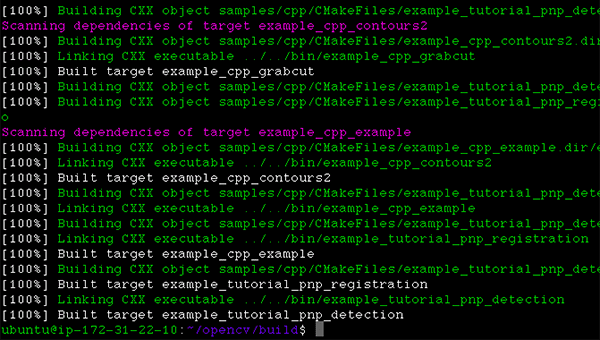
$ make -j8
You can replace the 8 with the number of cores available on your processor.
Since my processor has eight cores, I supply an 8. If your processor only has four cores, replace the 8 with a 4 .
As you can see, my compile completed without an error:
A common error you may see is the following:
$ make make: * No targets specified and no makefile found. Stop.
If that happens you should go back to Step #6 and check your cmake output — the cmake command likely exited with an error. If cmake exits with an error, then the build files for make cannot be generated, thus the make command reporting there are no build files to compile from. If that happens, go back to your cmake output and look for errors.
Step #8: Install OpenCV with "dnn" GPU support
Provided your make command from Step #7 completed successfully, you can now install OpenCV via the following:
$ sudo make install $ sudo ldconfig
The final step is to sym-link the OpenCV library into your Python virtual environment.
To do so, you need to know the location of where the OpenCV bindings were installed — you can determine that path via the install path configuration in Step #6.
In my case, the install path was lib/python3.5/site-packages/cv2/python-3.5.
That means that my OpenCV bindings should be in /usr/local/lib/python3.5/site-packages/cv2/python-3.5.
I can confirm the location by using the ls command:
$ ls -l /usr/local/lib/python3.5/site-packages/cv2/python-3.5 total 7168 -rw-r--r- 1 root staff 7339240 Jan 17 18:59 cv2.cpython-35m-x86_64-linux-gnu.so
Here you can see that my OpenCV bindings are named cv2.cpython-35m-x86_64-linux-gnu.so — yours should have a similar name based on your Python version and CPU architecture.
Now that I know the location of my OpenCV bindings, I need to sym-link them into my Python virtual environment using the ln command:
$ cd ~/.virtualenvs/opencv_cuda/lib/python3.5/site-packages/ $ ln -s /usr/local/lib/python3.5/site-packages/cv2/python-3.5/cv2.cpython-35m-x86_64-linux-gnu.so cv2.so
Take a second to first verify your file paths — the ln command will "silently fail" if the path to OpenCV's bindings are incorrect.
Again, do not blindly copy and paste the command above! Double and triple-check your file paths!
Step #9: Verify that OpenCV uses your GPU with the "dnn" module
The final step is to verify that:
- OpenCV can be imported to your terminal
- OpenCV can access your NVIDIA GPU for inference via the
dnnmodule
Let's start by verifying that we can import the cv2 library:
$ workon opencv_cuda $ python Python 3.5.3 (default, Sep 27 2018, 17:25:39) [GCC 6.3.0 20170516] on linux Type "help", "copyright", "credits" or "license" for more information. >>> import cv2 >>> cv2.__version__ '4.2.0' >>>
Note that I am using the workon command to first access my Python virtual environment — you should be doing the same if you are using virtual environments.
From there I import the cv2 library and display the version.
Sure enough, the OpenCV version reported is v4.2, which is indeed the OpenCV version we compiled from.
Next, let's verify that OpenCV's "dnn" module can access our GPU. The key to ensuring OpenCV's "dnn" module uses the GPU can be accomplished by adding the following two lines immediately after a model is loaded and before inference is performed:
net.setPreferableBackend(cv2.dnn.DNN_BACKEND_CUDA) net.setPreferableTarget(cv2.dnn.DNN_TARGET_CUDA)
The above two lines instruct OpenCV that our NVIDIA GPU should be used for inference.
To see an example of a OpenCV + GPU model in action, start by using the "Downloads" section of this tutorial to download our example source code and pre-trained SSD object detector.
From there, open up a terminal and execute the following command:
$ python ssd_object_detection.py --prototxt MobileNetSSD_deploy.prototxt \ --model MobileNetSSD_deploy.caffemodel \ --input guitar.mp4 --output output.avi \ --display 0 --use-gpu 1 [INFO] setting preferable backend and target to CUDA... [INFO] accessing video stream... [INFO] elasped time: 3.75 [INFO] approx. FPS: 65.90
The --use-gpu 1 flag instructs OpenCV to use our NVIDIA GPU for inference via OpenCV's "dnn" module.
As you can see, I am obtaining ~65.90 FPS using my NVIDIA Tesla V100 GPU.
I can then compare my output to using just the CPU (i.e., no GPU):
$ python ssd_object_detection.py --prototxt MobileNetSSD_deploy.prototxt \ --model MobileNetSSD_deploy.caffemodel --input guitar.mp4 \ --output output.avi --display 0 [INFO] accessing video stream... [INFO] elasped time: 11.69 [INFO] approx. FPS: 21.13
Here I am only obtaining ~21.13 FPS, implying that by using the GPU, I'm obtaining a 3x performance boost!
In next week's blog post, I'll be providing you with a detailed walkthrough of the code.
Help! I'm encountering a "make_policy" error
It is super, super important to check, double-check, and triple-check the CUDA_ARCH_BIN variable.
If you set it incorrectly, you may encounter the following error when running the ssd_object_detection.py script from the previous section:
File "real_time_object_detection.py", line 74, in detections = net.forward() cv2.error: OpenCV(4.2.0) /home/a_rosebrock/opencv/modules/dnn/src/cuda/execution.hpp:52: error: (-217:Gpu API call) invalid device function in function 'make_policy'
That error indicates that your CUDA_ARCH_BIN value was set incorrectly when running cmake.
You'll need to go back to Step #5 (where you identify your NVIDIA CUDA architecture version) and then re-run both cmake and make.
I would also suggest you delete your build directory and recreate it before running cmake and make:
$ cd ~/opencv $ rm -rf build $ mkdir build $ cd build
From there you can re-run both cmake and make — doing so in a fresh build directory will ensure you have a clean build and any previous (incorrect) configurations are gone.
What's next? I recommend PyImageSearch University.
Course information:
30+ total classes • 39h 44m video • Last updated: 12/2021
★★★★★ 4.84 (128 Ratings) • 3,000+ Students Enrolled
I strongly believe that if you had the right teacher you could master computer vision and deep learning.
Do you think learning computer vision and deep learning has to be time-consuming, overwhelming, and complicated? Or has to involve complex mathematics and equations? Or requires a degree in computer science?
That's not the case.
All you need to master computer vision and deep learning is for someone to explain things to you in simple, intuitive terms. And that's exactly what I do. My mission is to change education and how complex Artificial Intelligence topics are taught.
If you're serious about learning computer vision, your next stop should be PyImageSearch University, the most comprehensive computer vision, deep learning, and OpenCV course online today. Here you'll learn how to successfully and confidently apply computer vision to your work, research, and projects. Join me in computer vision mastery.
Inside PyImageSearch University you'll find:
- ✓ 30+ courses on essential computer vision, deep learning, and OpenCV topics
- ✓ 30+ Certificates of Completion
- ✓ 39h 44m on-demand video
- ✓ Brand new courses released every month , ensuring you can keep up with state-of-the-art techniques
- ✓ Pre-configured Jupyter Notebooks in Google Colab
- ✓ Run all code examples in your web browser — works on Windows, macOS, and Linux (no dev environment configuration required!)
- ✓ Access to centralized code repos for all 500+ tutorials on PyImageSearch
- ✓ Easy one-click downloads for code, datasets, pre-trained models, etc.
- ✓ Access on mobile, laptop, desktop, etc.
Click here to join PyImageSearch University
Summary
In this tutorial you learned how to compile and install OpenCV's "deep neural network" (DNN) module with NVIDIA GPU, CUDA, and cuDNN support, allowing you to obtain 211-1549% faster inference and prediction.
Using OpenCV's "dnn" module requires you to compile from source — you cannot "pip install" OpenCV with GPU support.
In next week's tutorial, I'll benchmark popular deep learning models for both CPU and GPU inference speed, including:
- Single Shot Detectors (SSDs)
- You Only Look Once (YOLO)
- Mask R-CNNs
Using this information, you'll know which models will benefit the most using a GPU, ensuring you can make an educated decision on whether or not a GPU is a good choice for your particular project.
To download the source code to this post (and be notified when future tutorials are published here on PyImageSearch), just enter your email address in the form below!

Download the Source Code and FREE 17-page Resource Guide
Enter your email address below to get a .zip of the code and a FREE 17-page Resource Guide on Computer Vision, OpenCV, and Deep Learning. Inside you'll find my hand-picked tutorials, books, courses, and libraries to help you master CV and DL!
How To Install The Blog Module To A Dnn Site
Source: https://www.pyimagesearch.com/2020/02/03/how-to-use-opencvs-dnn-module-with-nvidia-gpus-cuda-and-cudnn/
Posted by: humbertthosee.blogspot.com
0 Response to "How To Install The Blog Module To A Dnn Site"
Post a Comment